

Installing baseboard just prior to the finish plaster application
Baseboard is an excellent idea to consider for a straw bale house. It’s not just pretty and decorative, but perhaps more important, it’s functional too. The bottom of the plastered wall is delicate, and a bit of trim protects it from the inevitable sweeping, mopping, or chair leg careening towards the wall.
A couple of days ago, I just got finished installing baseboard in our straw bale house. Having gone through that experience, I have some new ideas for how to install baseboard trim in the future. Here’s what I did this time, and what I’m thinking might work in future projects, too.
Installing Baseboard Trim in a Straw Bale House
The trick for installing baseboard in a straw bale house is figuring out what the material ties into. What is the attachment point where the wood can be fastened? My original thought and plan was to install 2×4 deadmen along the bottom of the wall, providing an attachment point every couple of feet. This proved to be ineffective, as the deadmen want to pull out of the wall as a screw is being driven in. It’s also very difficult to drive deadmen into the wall and have them stick out equal amounts. In hindsight, this was a very lame idea.
What I mostly ended up resorting to was screwing the baseboard into the wood floor at a downward angle, and into the posts at the edges. This is, I admit, not the most elegant option. The baseboard is very stable, but I felt somewhat unsatisfied with this approach. Firstly, I would have much preferred to nail into a surface (instead of screw), which was not possible. I used GRK FIN/Trim Head screws, which are quite discrete and very strong, but they’re also expensive, and sometimes difficult to remove. (They have a tiny tiny torx head.)

4″ wide oak basebaord affixed and ready for the next step
A better choice may have been to bump out the toe-up under the bale walls. Our house, like many straw bale homes before it, has a 2×4 toe-up installed under the wall. However, it is only as wide as the bales themselves, and once plaster is applied to the bales, it disappears under 1-2″ of mud.
In the future, I might consider attaching a 2×2 or 2×4 to the toe-up, before any plaster was applied, to use as a nailing surface for the baseboard once the base coat plaster was fully finished. Simple enough, I think, and I’m not sure why I didn’t consider it earlier. I suppose the trick is understanding how finish wall planes interact with each other — a bale wall is only at its final thickness once finish plaster is installed, and it’s important to know roughly what this thickness is in advance when considering other things like window trim and the baseboard itself. Ideally, and kind of finished wood trim should extend beyond the thickness of the wall — not too much, not too little. A little reveal is a nice, clean touch.
A Note on Making Your Own Baseboard
Equally important to how the baseboard gets affixed to the wall is what the baseboard looks like. I got this idea from a friend, but I think it can be modified as well. I made our trim from oak 1x boards, ripped to 4″ wide. The 4″ boards went over the table saw a second time, getting a bevel cut on the back side (the wall side), leaving about a 1/2″ or less “reveal” on the front. See the photo below.
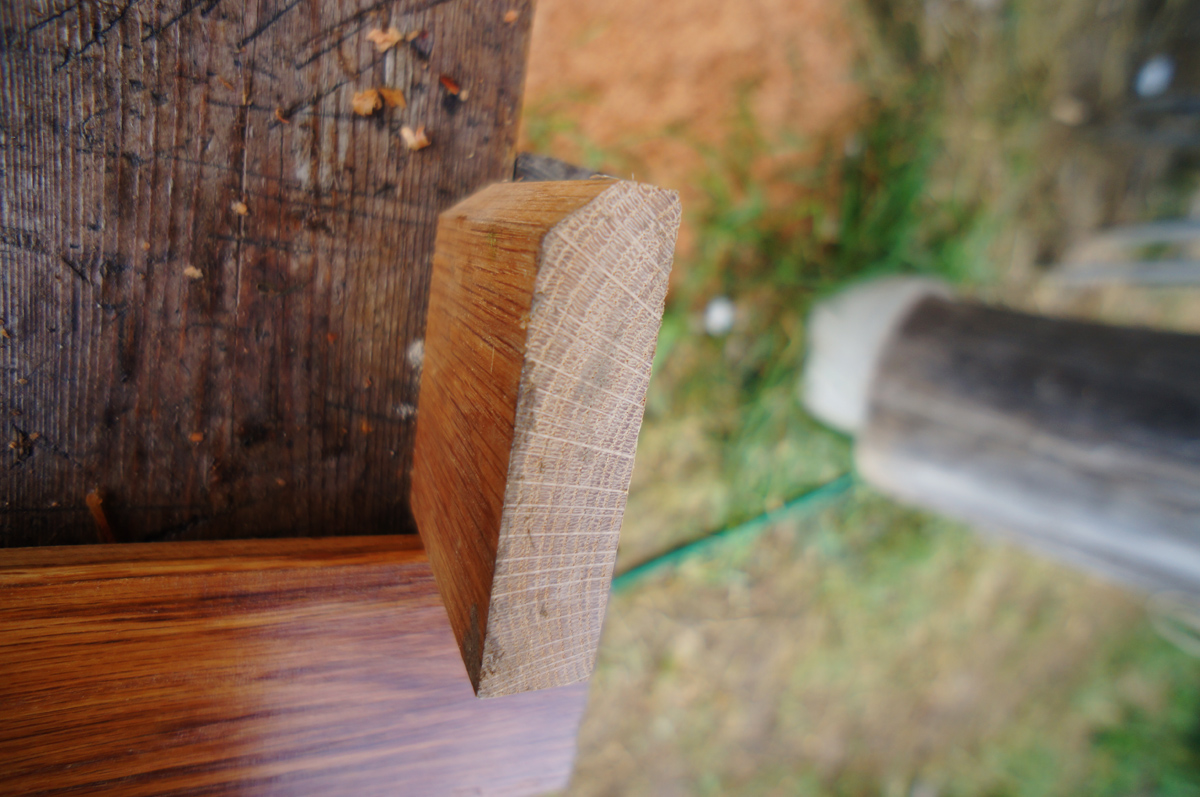
The wall side of the trim has a simple bevel for “tucking” the plaster behind
The idea is that the finish coat of plaster tucks into the bevel, and if/when the plaster shrinks, there should be no visible seam from where it’s pulled away from the wood. Nifty, huh? The angle cut should be pretty steep to achieve this, perhaps even a bit more than what you see in the image above. Another idea is to cut a rabbet into the back of the board, though that would be more difficult than cutting a simple bevel. Either way, this is an important detail if you want to achieve a clean interaction between plaster and baseboard. (You could use this same trick on any window and door trim, too.) I cut a subtle chamfer on the visible face of the trim with a block plane and called it complete.
Here’s what the finished trim and finished, plastered wall look like together.

The finished wall, with baseboard and finish clay plaster — note the reveal of trim beyond the wall plane
Hi Ziggy, this looks great! We visited DR this past weekend. It would have been great to say hello and see your work up close, but you looked very busy and we didn’t want to slow you down with all of our questions about the home! I am curious though, would this design/plot of land allow for additional sq. footage in the future?
Hi Ziggy, this looks great! We visited DR this past weekend. It would have been great to say hello and see your work up close, but you looked very busy and we didn’t want to slow you down with all of our questions about the home! I am curious though, would this design/plot of land allow for additional sq. footage in the future?
I like your second idea, of pre-planning to nail into the toe-up. But if you needed to use deaden, why not make them T-shaped, with the top of the T inside the wall, parallel to the wall surface. Assuming that the top the the T were firmly attached to the remainder of the deadman, that T-top/crossbar would prevent it from being pulled out.
As for a consistent length of deadman, couldn’t they be sawed off to length prior to use? A bit tricky, I know, and not as elegant as your second option. But it might suit the purpose in some instances.
About the bevel, aren’t you worried that it will become a dust trap and difficult to clean? (unless I am thinking of it backwards….)
In my house, we attached the baseboard over the finished plaster. No gap, perfect line. I used floor nails and wood glue. It is still holding up well. In the once place it got knocked off, I just added more adhesive and it was back in place.
I think in a strawbale house, since you don’t have studs maybe just adhesive would work. Or screw a hole through the baseboard and into the bale, shoot some glue in, and use a long dowel peg or even a sharpened pencil you could pound in . That could make it more secure.
Ryan: Oh darn, it would have been nice to meet you. It’s true, we’ve been extremely busy lately but we could have afforded a bit of time to chat. Our leasehold has room for additional building, and it’s possible this house can be expanded in the future… it’s really up to the imagination of the future owner!
Terry: Yup, they can be sawed off, or even easier… just driven in further. As for the “T” idea… I’m not sure how you would get the top section embedded in the wall.
Eric: Ideally, the bevel is hidden in the earth plaster, and all that’s left is the flat edge. The base coat should go basically all the way to the flat section, since the finish plaster layer doesn’t have much thickness.