
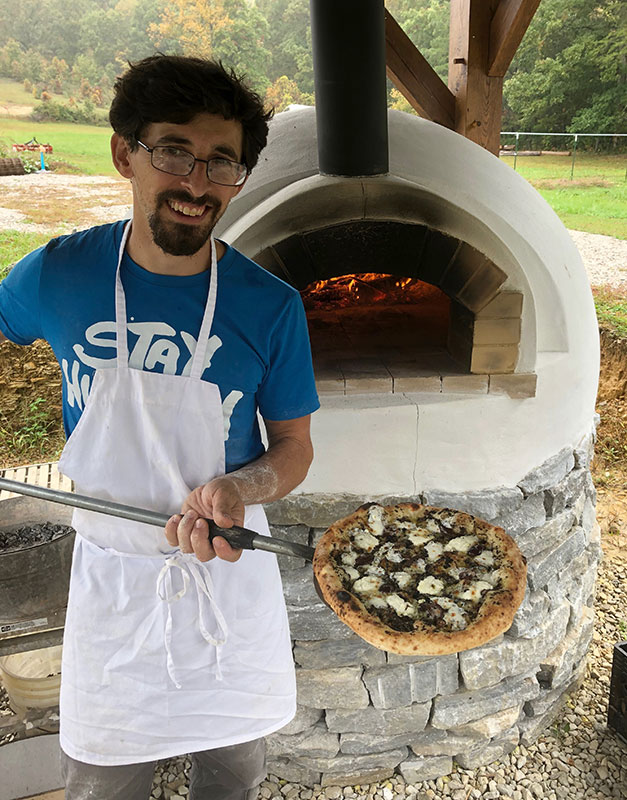

Last spring, I finally had the time to build the new cob oven under the timber frame pavilion we built in our 2019 Timber Frame Workshop. Our intention had been to use this cob oven to host monthly community pizza nights. (We’re doing that, although not in the same way I imagined it with the onset of the pandemic).
I took this opportunity to make some small but effective improvements to the standard cob oven design. After using the oven regularly for 8 months or so, I want to share those design enhancements and a few pictures of the construction process.
A Leaner Cob Oven Dome
The most common cob oven dome thickness seems to be 4″, as suggested in Kiko Denzer’s Build Your Own Earth Oven. I would never do more than 4″, and in fact I would possibly encourage less thickness than that. For the newest oven, I opted for a 3″ thick dome.

Why? A thinner dome will heat up and get to temperature more quickly than a thicker dome. Combine that with improved insulation (see below), and you have a more efficient oven that requires less firewood to get to baking temperatures, and still releases heat over a long duration.
My newest oven is 40″ diameter inside and will reach pizza baking temperatures after 1 hour and 30 min. to 1 hr. and 45 min. of actively feeding the fire. When I say pizza baking temperatures, I mean a hearth temperature of around 850-900 degrees and a dome temperature roughly equal to the hearth or slightly higher.
For frequent wood-fired oven baking, I think that a firing time of over 2 hrs. is impractical and suggests that something can be improved about the oven’s efficiency. A thinner cob dome also slightly reduces the overall footprint of the oven, which is always a good thing in my book.
Improved Cob Oven Insulation
In the past, I’ve relied on a mix of light clay straw for the insulation layer immediately around the cob oven dome. Light clay straw works surprisingly well, but there is one serious drawback. In order to be effective, the clay-straw must be at least 6″ thick, ideally more. As you can imagine, that dramatically increases the footprint of the oven. All of a sudden the foundation has to be 12″ larger in diameter.
For something like a 40″ interior diameter oven, things get really big really quickly. This time, I didn’t have the space to spare.


Taking a cue from wood-fired oven kit manufacturers, I decided to try out ceramic blanket insulation. Obviously this is not a natural material, but the performance is exceptional. Ceramic blanket comes in 1″ or 2″ thick rolls. I used 3 layers of 1″ thick blanket around and over top of the dome. (I also used some perlite on the very top of the dome.)
Suffice to say, this thing holds heat for a long, long time. There is minimal heat lost through the insulation layer — the exterior plaster is always ambient temperature, never warm to the touch. That’s a good thing. The fact that I can use less firewood with each firing of the oven makes a big difference over the life of the oven. Obviously, burning less wood is always a good thing.
Each fire and baking session is different, but here’s one example of how well the ceramic fiber blanket insulation works. Most recently, I fired the oven for about 1 hour and 45 min., and baked pizza over a 3 hour period. Note that I did maintain a live fire while baking the pizza, so that’s added heat. At 6 p.m. I stopped baking pizza and maintaining the small live fire. At 9 p.m., I took the coals out and closed the oven door. At 8 a.m. the next morning, the hearth and dome temperatures were about 450 degrees. Keep in mind the air temperature was about 35 degrees or colder, and my door is a piece of crap — leaky, lots of gaps, no insulation. Not bad.
I think that’s the result of 3″ of ceramic fiber insulation. I’m unlikely to go back to using clay-straw insulation. For folks who only intend to use their outdoor oven a few times a year, maximum efficiency doesn’t really matter that much. But if you regularly want to host events or bake bread for sale — efficiency goes a long, long ways to a great baking experience.
A Better Chimney and Brick Arch
I’ve always been unsatisfied with cob arch openings on our other ovens. I’m also firmly in the camp of believing that a chimney is essential. (I really don’t want smoke in my face for hours at a time…) Again, we use our oven regularly. Context.

I took a cue from Bjorn Bayer of Bear Natural Building for this brick arch design. It incorporates a cast keystone with a hole for the chimney, solving the problem of how to easily fit a chimney pipe into a brick opening of the oven. Way to go, Bjorn! I love the simplicity of this.


The keystone is a refractory cement mix, a combination of perlite, fire clay, and cement. The piece is cast with the chimney in place and then cured. The pipe is removed and the custom keystone is ready for installation into the final arch. It’s a little tricky to set up, but not too bad.
The mortar is a bit of a weak point in my oven — I used clay/sand mortar rather than cement, so it will need repair at some point. But overall, this is a foolproof way to incorporate a chimney into a brick arch.


In Summary…
As with anything, it’s all in the details with cob oven design. These three tweaks make a better performing, more functional oven. It’s also just a pleasure to use. There are a few details I would change on the next iteration, but I feel good about this oven and look forward to many more baking sessions.
Out of curiosity, how did you attach the blankets to the dome? Is that another layer of structural cob on the outside of the dome?
In other words, would the cross section be:
Void-cob-blanket-slip-cob-plaster-lime wash?
The blankets are merely wrapped around — there’s no other physical connection. The slip and plaster layers keeps everything tight. That cross section is basically correct, although I did a lime-stabilized clay plaster and lime plaster finish. 🙂